Showing posts with label interior design. Show all posts

Wednesday, March 20, 2013

{ chevron wall }

I love me a chevron print (as you can tell by my header). So much in fact, that I wanted to devote an entire wall in the nursery to it! After all, how hard could it be?

Welllllll (read that in a high pitched voice and draw it out nice and slow)...let's just say it was a labor of love. A love/hate relationship if you will. Loved it after it was finished. Hated it during the process. It was a pain, but well worth it! 

If you're going to tackle this, you'll need a few things- first things first, you need a lot of patience and time. If you rush this, you will have crooked lines. Ain't nobody got time for that! 

You'll also need a level (ours was a 36" level)
Green Frog Tape (so important! the blue stuff isn't as good and lets paint seep through- this green stuff didn't bleed at all and our walls are a bit textured. Trust me)
Pencil & Eraser
Stool or Ladder
Paint (duh)
Paint Brush 
4" foam roller (I thought the foam roller covered nicer than the fluffy roller)

We started by painting all four walls a light, warmer gray. (I can't remember the color but it was a Behr Ultra Premium paint with primer from Home Depot & covered the orange wall beautifully with only 2 coats!)

When that dried, we set out on measuring our pattern. We measured the whole wall across & divided that into how many zig zags we wanted in the wall. So for example, my wall measured roughly 10 feet wide or 120". I wanted my chevron pattern to be fairly wide, so I decided each angle would be 12" wide & make 10 points total (hopefully that makes sense).

We (and by we, I mean the handyman) marked 12" across and made a little notch with the pencil. Then, we measured 8" under each notch and marked it on the wall (I wanted each of my chevrons to be 8" tall). 

Now, here's the important part, you must make sure that your marks are all level or they will be crooked! Level vertically and horizontally! This is where the level comes in!

 Once your marks are all up and everything is level, you're ready to start taping. We put tape in between the lines we weren't going to paint, so we didn't get confused. Oh, and to make sure each point was nice and sharp, Andrew carefully cut each mark with an xacto knife.

 Finally it was all taped up! The easiest part was painting it! 2 coats of white paint later and it was done!
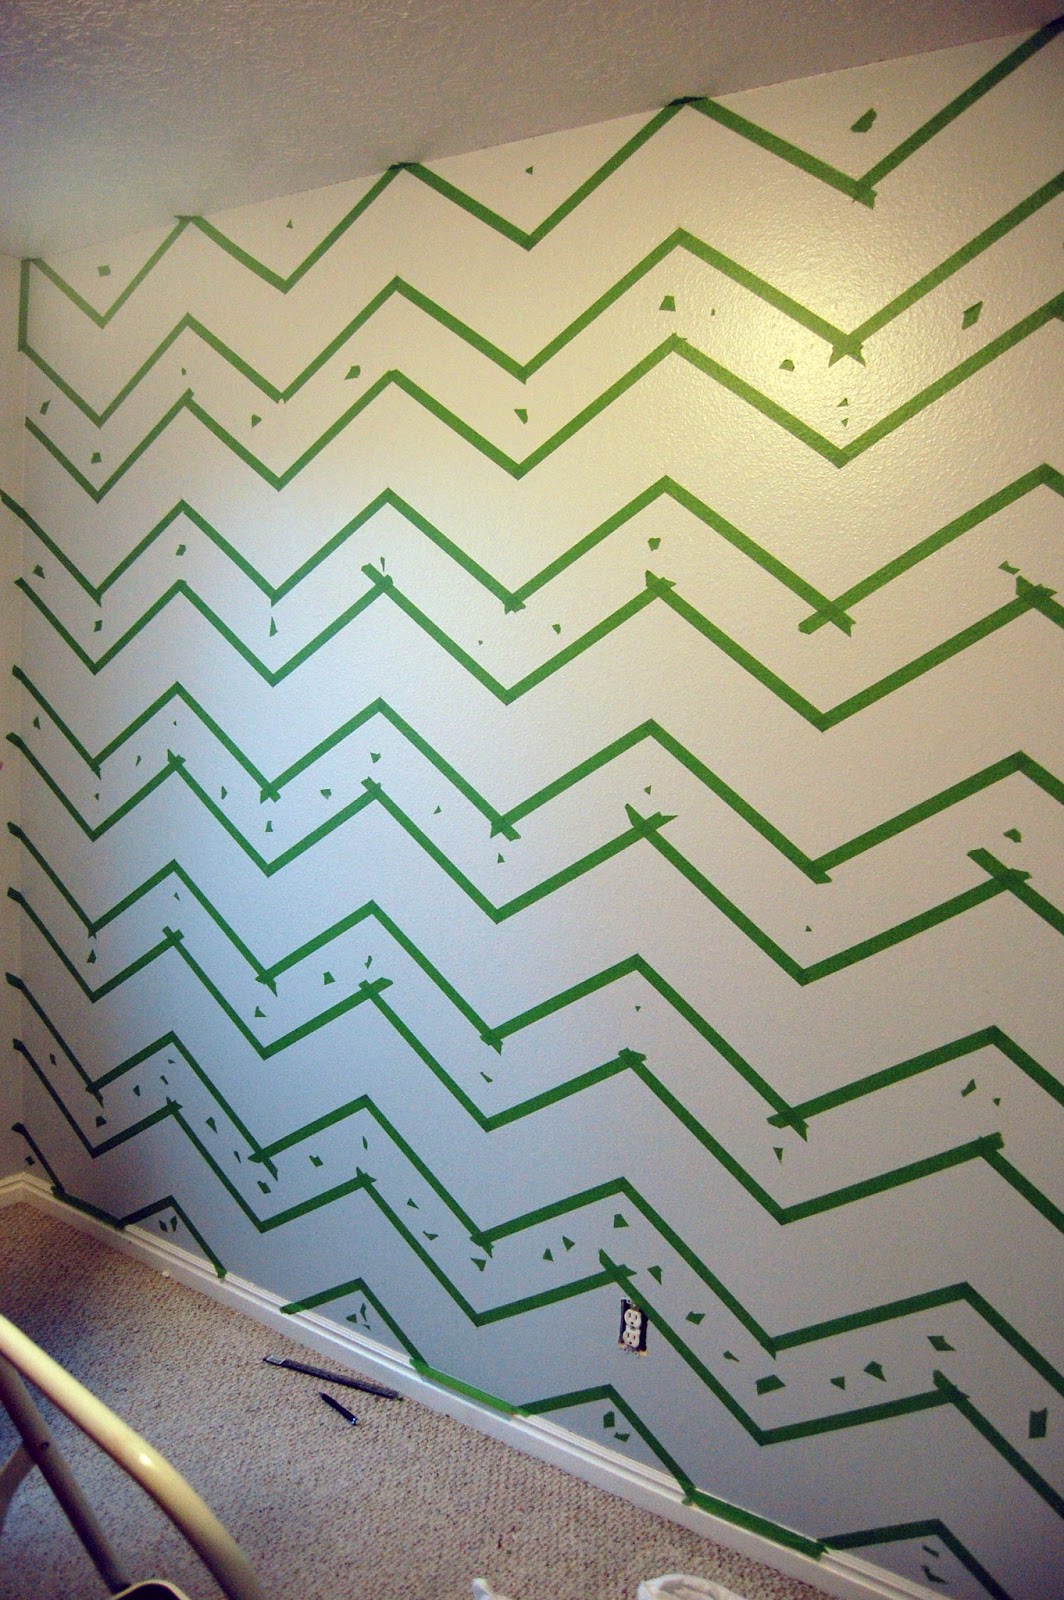
 I let it dry for about 30 minutes and then peeled the paint off (I was impatient and had to see how it turned out). I loved it and decided it was worth all the effort!  


Saturday, March 9, 2013

{ Baker's Nursery }

I must admit, when I found out we were expecting, I was so excited - not just for a baby, but to decorate a nursery! I could hardly wait to find out what we were having so I knew what direction I wanted to take as far as colors go! (Although designing a gender neutral nursery would be fun!) 

When we found out we were having a boy, we instantly knew his name. Baker, for those of you who don't know, is a family name. It's my mom's maiden name and I've always thought it would be a great first name. I told Andrew years ago that I loved the name Baker and he immediately thought it was cool too. Because the name is fairly unique, we kept it on the down-low until he arrived. Our family only knew his name started with a B, and I knew I wanted to incorporate his monogram in the nursery. 

As you can see, I was definitely inspired by the chevron print. I knew I wanted gray and white walls with hints of turquoise throughout the room. I didn't want it too matchy matchy though, which is why I added pops of other colors in his quilt & in the artwork.
 
I wanted to make a quilt for my little guy and found a great tutorial for a chevron quilt on Pinterest. Click here for the link. It was my first quilt and it turned out fabulous! I'll post the details of my projects later- for now this is all about the nursery!
 Awhile ago on one of my business trips to Boise, I found an adorable, vintage childrens book called The ABC Book that was in great condition. The framed print is a page from that book. The old truck painting was given to Andrew by his artist friend (it's a painting of Andrew's favorite truck), and used to hang in his office (now the nursery). I loved how it looked so we kept it up! And last, the B is for Baker print is from the On To Baby website. You can find the link to the free printable here. I had mine printed at Costco for about $1.

What do you do with all of your cute cards you get from your baby showers? I pulled some of my favorite and used a wire card holder to display them! It's a fun way to display art in an unconventional way! 
 The changing table hutch is one of my favorite finds, well, besides his crib! I got Bakers crib from my parents neighbors who were having a yard sale. I actually bought it before I was even married! How could I pass up a $60 crib?! And one from Pottery Barn? It's traveled around with Andrew and I from house to house and then sat in our attic for years. When we brought it down, all we had to do was wipe the dust off and set it up! I love it!
The changing table hutch was a classified find. I called the lady and offered her $20 more than what she was asking because it was exactly what I was looking for and I had to have it! After a coat of white & turquoise paint, and it was perfect!
The crate shelves are just that- stacked crates! Cheap, fun, easy shelving for a small area!

Where I found the other items...
Glider: Target 
Curtain Rod: Pottery Barn 
Curtains: Ikea
Shelf above crib: Ikea
Frame with ABC Print: IkeaLamp Shade: Ikea
Crates: Joann
Crib Sheets: Target
Quilt Fabric: Down Under by Mint Blossom
Crib Skirt Fabric: Quilting Cottage

Saturday, November 3, 2012

{ nursery design }

I think I'm pretty set on a color scheme for little guy's nursery. Different shades of gray, aqua, & yellow. What do you think?

(The links to the pictures are on my pinterest baby board)

Monday, May 28, 2012

{DIY ampersand painting tutorial}

I finally did my picture wall! Goodbye huge clock! Hello cute pictures! I had an idea of what I wanted for my wall and I have a thing for ampersands, so when I was thinking of what to do with my wall, I decided to paint my own ampersand! This was such an easy, fast project and you can do it in so many colors! Here's how I did it...

First, I bought a cheap white 10x10 canvas from Big Lots for $5. Then I spray painted it with glossy Krylon spray paint in Navy. Since my canvas was white, I had to paint a few coats. Be patient & let it dry in between coats or you'll end up with a streaky mess!

After I sprayed my canvas, I grabbed an array of white paints, a pencil, fine tipped paint brushes, & printed a big ol' ampersand out on my computer. I found the ampersand I liked on Pinterest and I used photoshop to make it big - really big- like 7" or so.
 Then I roughly cut my amperand out, laid it on my canvas, and traced around it with a pencil. The pencil was visible enough to outline and know where I needed to paint, but if you use a darker shade of paint than navy, you might need to outline with a white pen to see where to paint.
 After I outlined my stencil, I started painting! I used a color called egg shell for the overall color, and then on the left edges of my ampersand, I painted bright white to give a little dimension (although it's hard to tell from the picture). Make sure you use a fine tip paint brush that's not too flimsy. My tip was probably about 1/4" thick with a pointed tip.
 
 Once I was finished and let it dry, I hung it with some other pictures and I love how it turned out!

Tuesday, November 22, 2011

{coral & blue grey}

 I love coral & blue grey together. I think this is the color combo I'm using for my guest bedroom. Thoughts?

Monday, November 21, 2011

{toilet paper roll art}

We buy toilet paper in bulk. Not that we go through it quickly (there's only two of us here), but it's much cheaper and easier to buy a huge pack of Charmin at Costco every 6 months than it is to remember to buy the little 6 packs here and there. It's nice to have stock if you know what I mean. Nobody likes to be stranded thinking, "Can you spare a square?"

Anyway, it never occurred to me to save the empty toilet paper rolls until I started seeing these projects popping up all over the place.  Kinda neat, right? I think I'll start collecting the rolls to make a project of my own!


Saturday, November 19, 2011

{Featured Project: Before & After Kitchen)

I love me a good makeover, so when my friend and former interior design classmate Aubrey posted pictures of her new kitchen, I had to share! I love Aubrey's style. It's clean, sophisticated, and classic. She has an eye for great design and it shows!

This was her kitchen before- good bones & nice Corian countertops, but she wasn't feeling the blonde maple wood. 

 And this is the after! I love, love, love it!
 
After painting the walls a lovely taupe gray (dove grey to be exact), they had a contractor come in and refinish all the cabinets in white, except for the island, which she painted navy blue. Then they added satin nickel cap pulls and knobs and finished the space off with a white staggered subway tile backsplash, complete with light grey grout to match the existing countertops.

Isn't it lovely? I'm totally inspired! Aubrey, thanks for letting me share your beautiful kitchen!
You can find more of Aubrey's designs at Designs by Aubrey. 


Wednesday, November 2, 2011

{black and white dresser}

Hello loves- thank you for your sweet comments. Sometimes, a girls just gotta have a little break down and cry, and boy did I cry on Sunday. Do you ever have days when you feel like you really just can't stop crying? It was frustrating, because I wanted to be over it but the flood gates weren't ready to close. So I just went with the flow (no pun intended). Anywho, I'm better now.

I've been wanting to change up my living/dining room for awhile now and I've had navy/white/black on my mind- just little accents of it here and there. I want to change my pillows, paint my dining room chairs, & my little dresser. Currently, they're this color...

 Kind of a gray/turquoise. I love that color but I'm kind of over it. I'm thinking of painting it white on the bottom and black on top. I found these pictures on Pinterest. (which by the way, I'm addicted to)
Or maybe something like this...although this might be a little too bold and I could see myself getting sick of it easily...thoughts?


Thursday, October 27, 2011

{as of late}

My poor, poor craft room. I used to craft in there...and then it became more of a storage room/toss messes from other rooms in there and shut the door type of room. I hated it because I'm a big believer in utilizing all of the rooms you have for their intended purpose, and I'm pretty sure when this house was built, they wouldn't have put a window in a storage room. Know what I'm sayin? So I've been cleaning house, big time. I had so many "could be" projects in there that I had forgot about and now I just don't have time and to be honest, some of the projects I wanted to do, I'm not that into now. Funny how your style changes, right? I'll post somethings tomorrow on here to see if any of you want them for a steal!
In the mean time, this is what I've been working on. The closet portion of my guest/craft/maybe nursery someday room. I wanted to put a desk in my closet, but the built-ins didn't really accommodate, so I did what any crafty girl would do. I tore out half of my closet. And it was a blast! Seriously, hitting the crap out of those shelves was therapeutic. Andrew thought I had gone mad, and I probably had to be honest. My clomid dose had doubled and if you've ever been on a high dose of that shiz, you know what can go down!


So here's the before...
 During...
 and after...well, most of it.
I hand painted the stencil, which I thought would be easy (Other bloggers that had done the same thing made it look sooo simple. They lied. It was a pain in the butt...and  my wrist.) Just don't look too close, k?

The light, shelf, brackets, and magazine holder are from Ikea. The magnet frame is also an Ikea frame. Love me some Ikea. I'll explain how I did the desk later, when the entire thing is finished.
 P.S. Speaking of Ikea- the same day the hubs and I were out shopping for these supplies, a reader approached me out of the blue and told me how much she loves my blog! I was so shocked someone actually read my blog and recognized me! So, thank you dear reader, for making my day and for the sweet compliment! You made me feel awesome. :)

Monday, October 3, 2011

{navy}

I'm loving navy accent walls right now and I'm seriously considering painting one in my dining room! Navy and white feel so clean and crisp together, and they don't have to feel too nautical. I love these examples from Houzz.com!
Harlem Apartment - Hall eclectic entry
Catalano Residence eclectic dining room
West Coast Hampton traditional living room

Wednesday, August 17, 2011

{parade of homes}

Karlie and I went to the parade of homes a few weeks ago and it was awesome! I got a lot of ideas & it made me want to completely redecorate my house! While there were many homes I loved and found inspiration from, I felt like there was also an equal amount of homes that were a bit disappointing. We started our day in Daybreak because that was were the largest cluster of parade homes were. One big theme that I noticed in a lot of the homes this year was IKEA furnishings. Now, don't get me wrong- I love IKEA and think they have great home accessories and cute furniture, however, when I go to the parade of homes, I don't want to see a house decorated strictly with IKEA furniture. Heck, I can walk around IKEA for free and get my fill of Swedish trends (and meatballs!) I go to the Parade of Homes to see fresh, new, fun ideas with nice furniture that you don't see everywhere else. Know what I mean?

Anyway, so this was the very first house we went to- and yes, it was an "IKEA House".
Even though they used a lot of IKEA furniture, I did love how they accessorized! I especially loved this coral!I also loved this window seat in the kitchen! I also have a bay window and might attempt this project! It's can't be that hard, right?
This next house wasn't even part of the Parade of Homes, but it was right next door to one of the houses and I'm so glad we went inside! This was one of my favorite houses and I LOVED the decor! A real estate lady was in the house and when we told we were just looking and that we were touring Parade of Homes houses, she acted pretty miffed and bugged that we weren't there to buy. Which, you'd think they'd want the publicity from the Parade of Homes, right? I also asked her if she knew the name of the designer and she said they were a firm in Denver and wouldn't give me the name, which was dumb! I wanted to know the name of the fabric on the windows and she wouldn't say.
This was the office, right off the entryway. Love!
The dining room across from the office. Does anyone know where to buy the branches they have on the table? They were plastic and fabulous!
Living room- very cool & very blue & white- it was a household theme.
I really liked the dark wood in the kitchen (we saw a million white kitchens!) but I hate the wasted space above the cabinets! I would have installed a smaller cabinet on top with glass in the doors & lit from within. This was another house in Daybreak that we loved! This home had such amazing furnishings and such fun colors! I loved the rug in this living room & found myself lifting corners & looking behind frames to see if I could tell where they purchased! I found lots of Z Gallerie tags, so it looks like I might need to schedule a shopping trip! Remember what I was talking about with the cabinets in the picture above? This what I would have done. Bravo to the designer who utilized all the cabinet space! And don't you just love the lighting? This was another favorite house!

Monday, April 25, 2011

{gray and yellow bathroom}

At cooking group tonight, my friend Ryanne told me she wanted to redo her upstairs bathroom using yellow and gray. I love that color combination (it's so happy!) and couldn't help but browse around and put together a design board for a gray/yellow bathroom! You like?
Towels & Shower Curtain from Target
Apothecary jars from Restoration Hardware
Rug from West Elm
Be Happy print from The Love Shop

Saturday, March 26, 2011

{confession: my hidden mess}

We all do it- Stuff things we don't want to put away in a closet or a bedroom and close the door, or in my case, shove everything upstairs where it will be out of sight for company.

I did it yesterday as I was cleaning up and preparing for family that was coming over later that evening. This whole week has been a crazy blur, and I haven't had the time or the energy to clean up. So, what do I do when I know I'll have 12 people in my house? I clean the heck out of the downstairs, vacuuming, decluttering, dusting, and sweeping, and then I pile everything else upstairs, where I can get to it on Saturday.

So last night, after visiting the Carl Bloch exhibit, I invited my in laws over for cake and ice cream to celebrate my mother in law's birthday. Andrew's cousin Bexi, who I adore, was coming over as well and mentioned that she couldn't wait to see my house & how I've decorated it (she'd never been over before and seen it in it's clean glory). I told her that she can browse all she'd like downstairs, but upstairs was a disaster and off limits.

Well....apparently, my comment fell on deaf ears, because minutes after everyone came over, I heard footsteps upstairs. All I could think was OMG- someone is upstairs! As I ran up the stairs, I felt like I was in a movie scene, yelling, "Nooooo!" in a low, slow voice (you know how it sounds when it's in slow motion?) as I ran up there to try to divert them from the war zone they were stepping into, but it was too late. They saw what I had tried to hide. My secret mess. Evidence that I hadn't put anything away for weeks was spewed everywhere.

I stopped at the top of the stairs and assessed the situation. My options were few, but I knew what I had to do. Grin and bear it and embrace the situation. So, I gave them a tour of my upstairs, mess and all. Bexi, bless her heart, had followed my brother in law and his girlfriend upstairs when they came over (although I'm not sure why they headed upstairs the minute they arrived), and even though it was a mess, Bexi loved it and gave me the nicest compliments. She is one of those people who gives genuine, sweet comments and means them.
And so, now that I've shared my dirty secret, I'm pushing it a little bit further. I'm showing you exactly how it looked, as they saw it. Not a thing has been moved or shoved in a cupboard. This is my real life baby! And heaven knows, I've seen my share of blogs with houses that are spotless and organized, but let's be honest. Life isn't always spotless and organized!
Here is my living room, clean and lovely, as it should be, right?
Well, put on your hard hats ladies and gents...you're about to step into the danger zone!
Love how my cat is leading the way. He's your guide through the mess!
The hallway- notice the vacuum and mop bucket? See, I do have intentions of cleaning up! ;)
Just don't take too close of a look at the mop bucket. You'd see that most of the water that was in there has evaporated, as it's been there since last week.

Please tell me your counter top looks like this too...or are you one of those people who puts it all away and wipes the counter down after you get ready? If you are, we are now frenemies. j/k...sort of.
This is where the magic happens. Too bad I can't say "Abra Cadabra" and make the mess disappear!You know the song "Pants on the ground?" Well, I wrote one about pants on the wall. I hope it'll make me famous. You can read about the real reason for the pants on my wall here.
Dirty Office/Man Cave
I was going to put a black bar over Andrew's eyes, so you wouldn't recognize him and to protect him from any humiliation, but then again, the mess is his too...and so I left the black bar out.
And this is the messiest of them all! My craft room/upholstery room/sewing/fabric/stash it in there and close the door room.

So there you have it. Now it's time to share your space. Take a picture in your house as it is NOW and post it, then share the link in your comment. Try it- It's freeing! :)

Now if you'll excuse me. I need to clean up a bit. ;)